Planning
The planning system of the CaterROS project controls all the other systems of the project and let’s them work together. It uses the planning framework CRAM to control the PR2 and TurtleBot via flexible plans. The system communicates with the Pepper robot’s systems to gather knowledge about the dialog with guests.
Installation
To install the planning system to your workspace, you need clone the repository to the source folder of your workspace. After that you can use wstool and rosdep to install the needed dependencies:
cd ~/path_to_my_ws/src
git clone https://github.com/suturo16/planning.git
wstool merge planning/dependencies.rosinstall
wstool update
rosdep install -riy --from-paths .
Now you can build your workspace using catkin.
Optional: Plan Generator
If you want to use the plan generator you have to install the fast downward planer from http://www.fast-downward.org/ in addtion. This package is not needed for building the planning module. You can find a detailled description of how to setup and use the fast downwards planner at http://www.fast-downward.org/ObtainingAndRunningFastDownward.
Create a new folder within your dependency workspace, e.g. “planner”.
Within this folder, create a new file named “setup.py” with the following structure:
#!/usr/bin/env python

from distutils.core import setup

setup(name='planner',
    version='1.0',
    description='pddl planning system',
    author='someone',
    author_email='someone@stuff.net',
    url='https://www.python.org/sigs/distutils-sig/',
    packages=['downward'],
)
# You can choose arbitrary values for the given fields.
To ensure that all necessary dependencies are installed, execute:
sudo apt-get install cmake g++ g++-multilib mercurial make python python-pip
Then, you can clone the planer to the folder that you created in step 1:
cd planner
hg clone http://hg.fast-downward.org downward
Build the planner:
cd downward
./build.py
Create an empty file named “__init__.py” within the “downward”-folder.
Go to the subfolder “driver” and within the file “main.py” uncomment the line “sys.exit(exitcode)”:
# sys.exit(exitcode)This is needed because otherwise the plan generator’s server won’t be able to give a return value when being called.
Now, you can finally install the planner as a python module. This is necessary so that the plan generator can get access to it. Go to the folder you created in step 1 and execute:
sudo pip install -e .
System Overview
The main focus of the system is of course the execution of plans. There are two ways supported by the system: Direct and Guest-centered Execution. Direct means a user of the system executes a plan by calling the appropiate function and the system halts after the completion. The guest-centered on the other hand can run permanently until explicitly stoppped. It keeps track of the current state of the PR2 and decides what to do based on the guest’s orders. This enables the system to dynamically react to changes in the guest’s orders. Additionally to the predefined plans, the system also can generate plans based on the orders by guests.
Architecture
Let’s have a look at our architecture. The following picture depicts our modules and how they use each other.
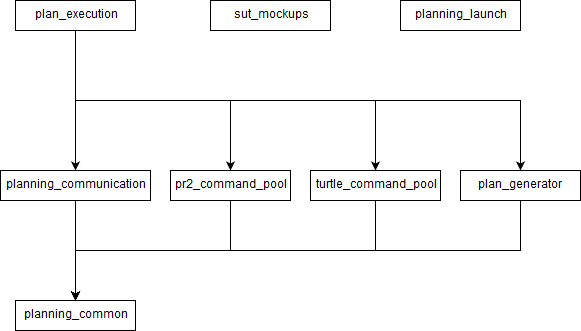
An overview of the architecture of the CaterROS planning system.
Modules
planning_common
The common module of our planning system. It holds functionality which is or was considered to be universally useful for our system. This ranges from simple utility functions and object definitions to the interface for calling prolog function of the knowledge base and robot-agnostic service calls and such. In here you can also find everything that didn’t belong in the other packages but didn’t warrant it’s own package.
Robot-specific command pools
The robot-specific modules hold functionality especially necessary for that robot.
The pr2_command_pool package mostly holds calls to the action_move_robot function from planning_common to move the PR2. Some utility for these calls can also be found here.
The turtle_command_pool package holds everything which is needed to manipulate the turtle from the high-level, which means cram action an location designator definitions, the process module of the turtle and the action client.
planning_communication
The planning_communication module contains a RPC server implementation to enable the planning system to communicate with Pepper. It also contains a RPC client for the system to call functions of Pepper’s RPC server. Additionally the parser for Pepper’s JSON-data-structures can be found here.
plan_generator
This module consists of an Python service to call the plan generator and the Lisp interface to generate problems for the generator and a parser for the generated plans.
plan_execution
The top-level module of our system. If you want to execute our plans, you have to load the system in this package. It contains all of our plans and the utilities to execute them. This includes our CRAM process modules and designator referencing.
The loop-function for the guest-centered plan execution can also be found here.
sut_mockups
There are mockups for all major nodes of the other systems. Those can be found in this package.
planning_launch
This package only holds two launch files for launching our mockups.
Plan Architecure
As mentioned above we use the CRAM framework in our system. More specifically we use process modules and action designators to make our plans dynamic. For a more detailed look at CRAM itself check the website
In the planning_execution package are the files toplevel, process-modules, selecting-process-modules and action-designators. Those contain everything that uses CRAM in our code. In toplevel we have the execute function which takes a string and executes the corresponding task. We define a task as a set of actions, or rather action designators. Each of the action designators gets referenced by using prolog to query the knowledge base. After this they get executed by the right process module. This happens automatically, as we have defined rules in selecting-process-modules to match process modules to designators. The process modules then directly call the plans in plans.lisp with the referenced information in the designator. The plans can also call sub-plans, but they don’t use any more designators. All the information a single plan needs is obtained when an action designator is first referenced.
For the guest-centered execution we have the manager. The name is a bit misleading, as this module doesn’t actually manage the plan state or anything. It provides a function start-caterros which starts a loop that can be started anytime and then waits for guests to arrive. This is where the communication module comes into play. Through the RPC communication with Pepper the knowledge base gets updated parallel to the running loop. The loop can query the knowledge base through prolog.
Communication
There are three robots whose actions and knowledge are to combine. The planning_communication package prvides the communication between the Peppers dialogsystem and the ROS network, where the PR2 and Tortugabots are monitored. To include Pepper we implemented an RPC server on the Planning side, whose functions can be called from everywhere within the network, while concentrating on Peppers information. On the other hand the Planning side can feed Pepper with data and notify her about important changes in the world. To enhance the monitoring aspect of the Planning system, we save and update connection credentials of every system communicating with Plannings server.
Setup Pepper Communication
A setup file launches the RPC server and registers Peppers IP and Post to the list of available clients. Also it sends the IP and Port of the current machine to Pepper. This seput is called by the plan_execution init function, but if we want to look deeper into the planning_communication package, let’s make the setup by ourselves. The final call, updating Peppers information about this machine, would fail anyway, if Peppers server isn’t currently running.
RPC-Server
To initialize the RPC server, first load the planning_communication system in your REPL:
, r-l-s RET
planning_communication RET
RET
,!p pcomm RET
Now that we work in the pcomm package, run the init-function of the server:
(init-rpc-server)
This function will simply start up a new ROSnode in the REPL and register all the functions provided by our RPC interface. The core functions used by Pepper are updateObserverClient, asserDialogElement, getGuestInfo and getAllGuestInfo.
updateObserverClient takes the ID of the robot (0 for Pepper), its ip as a string and its port as a number. assertDialogElement takes a JSON string, that will be translated and forwarded to te knowledgebase. The whole variety of JSON queries is explained later. An example JSON string to order two pieces of cake looks like this:
{
guestId:1,
query:  {
        type:setCake,
        amount:2,
        guestName:Arthur
        }
}
The function will always answer the request with a JSON as well, telling if the request was processed successfully. This is the answer to the order sent previously:
{
guestId:1,
return: {
        type:setCake,
        success:1,
        tableId:table1
        }
}
Only upon the request of a new order (type: setCake) the response contains the tableId of the guest, every other response lacks this information.
getGuestInfo needs a guest-id and returns all information about the order identified by this specific guest-id. A common response for the guest-id 1, considering we transmitted the order above, looks like this:
{
guestId : 1,
return: {
        type: getGuestInfo,
        name: Arthur,
        location: table1,
        total: 2,
        delivered: 0
        }
}
getAllGuestInfos returns a list, containing all orders in the same format as a request for a specific guest (see getGuestInfo). It is called with any arbitrary parameter (there is a conflict when calling RPC function from Python to LISP, when the LISP function has no parameters).
RPC-Client
The core functionality of the RPC client is to send RPC to Pepper. Mainly we use update-connection-credentials and fire-rpc-to-client. To make those calls more developer/user friendly, we have a list of clients, that use the Planning RPC server. We can take those connection credentials to fire a call to clients, using only their keynames.
update-connection-credentials will send the IP and port of the current machine (where the Planning server is running) to a remote client identified by its keyname, or to a yet unknown client using its IP and Port. The client must have an updateObserverClient function implemented on their side. After this call, the remote client will have information about our server. Here is an example usage:
(update-connection-credentials :client :pepper)
fire-rpc-to-client calls a function at a remote client. It uses the clients keyname, the function name and arguments needed in the function:
(fire-rpc-to-client :pepper "notify")
Plans
We defined different plans to realize our scenario:
grasp
There is one plan that enables the PR2 to grasp various objects. How to grasp the actual object is decided on the basis of the given object type. Possible objects that can be grasped are: a knife, a plate, a spatula and a cylinder.
place-object
The plan place-object can be used hold a given object to a given location. Optionally, the object can be released so that this plan can also be used to drop objects to a given location. The given object has to be grasped already.
detach-object-from-rack
This plan is used to detach objects that should be taken from the rack. It assumes that the given object was grasped already. In our scenario, this is only used for getting the knife.
cut-object:
The plan cut-object is used to cut a given object (in our case: a cake) with a given knife. It assumes that the knife is grasped already. Additionally, a target can be defined optionally. If a target is given, the slice that was cut is moved there. In our scenario, we pass the spatula as a target so that the PR2 pushs the piece of cake onto it after it was cut.
move-n-flip:
Move-n-flip is used to move a given tool to a given location and then flip it. In our scenario, we use it to drop the piece of cake on the plate after it was pushed on the spatula.
Plan Generation
The plan_generator module allows to dynamically generate a sequence of actions that are needed to fulfill a given goal (in our case: serve a given amount of pieces of cake). Therefore, it provides access to the classical planning system Fast Downward from http://www.fast-downward.org/ using a ROS service in python. The service returns the resulting actions in a JSON-format that can easily be transformed to the action designators that are needed by our system.
The Fast Downward planning system needs two inputs: a domain definition and a task definition written in the Planning Domain Definition Language (PDDL). You can find a good introduction on PDDL at: http://www.cs.toronto.edu/~sheila/2542/s14/A1/introtopddl2.pdf. The domain definition describes the given environment which is mainly about the kind of objects that can be found there, the properties that they can have and the actions that can be used to change their properties. In our case, all the tasks that can be occur are placed in the same domain, so we defined the CaterROS domain. A task defines an initial state and a goal state. The planning system then shall find a sequence of actions (as defined in the given domain) to get from the initial state to the goal state. Therefore, the task definition also contains the concrete objects that are given (for example knife0 as a knife). The plan_generator module provides methods to generate a task file automatically depending on the amount of pieces of cake that should be served. The other objects and properties of the objects are fixed since they cannot (and don’t have to) change within our scenario.
To use the plan generator for the CaterROS scenario, just start the python service:
rosrun plan_generator generate_plan.py
Now the demonstration can be run using the plan generator.
Executing Plans
There are two ways to execute the plans. Either by calling the execute function directly or by having guests in the knowledge base and let the system decide what to do on it’s own.
Setup
To call the plans you need to load the plan-execution-system in the plan_execution_system. So open up the roslisp REPL by opening a terminal and typing:
roslisp_repl
In the REPL type:
CL-USER> (ros-load:load-system "plan_execution_system" :plan-execution-system)
And go into the package:
CL-USER> (in-package :pexecution)
Direct
Now you just have to call:
PEXECUTION> (execute "demo")
To start the demo task. The task gets evaluated to designators and those get referenced to real plans. In toplevel.lisp is a function task->designators in which all the tasks and theirs corresponding designators are defined. The most important ones are the “steps”, which can be executed in order to execute the whole scenario of the CaterROS project. The prep, cut and deliver ones are also important as they are the ones called by the guest-centered method, but htey can also be executed directly.
Guest-centered
Now you call:
PEXECUTION> (start-caterros)
This starts the guest-centered plan execution loop (or GCPEL, as I certainly will never call it). As long as there is no guest present in the knowledge base the loop prints a message that it’s waiting for a guest. When a guest arrives and makes an order, the loop will start executing the plans. First it will execute the prep task, to grasp the tools. Then it will cut as often as the guest ordered pieces of cake. And lastly it will deliver the plate with the cake onto the TurtleBot, which will then bring it to the table.
If you want to test this without using Pepper`s Dialog system, you can call the test-guest function. It will generate a dummy guest in the knowledge base.
Mockups
The mockups package provides mockups scripts for all major components of the CaterROS project (excluding Knowledge) written in Python.
Usage
To start the mockups there are two launch files in the planning_launch package. You can start the mockups themselves with:
roslaunch planning_launch mockups.launch
If you want to use the knowledge base, use:
roslaunch planning_launch mockups_w_knowledge.launch
It can happen that the tf_subscriber node fails to launch properly when launching latter the first time. If this happens, just relaunch it and it should be fine.
You can only run plans if you launch with knowledge, because every plan needs to query the knowledge base. The first launch file is only for testing purposes when implementing service or action calls for example. But with the knowledge base launched you can run any plan and check if the plans themselves can be run without errors.
Most of the mockups have some support for the ROS parameter server. The graspkard mockup can either always instantly return an error value of 0 or simulate a optimization process over a few seconds. And the perception publisher’s objects can be altered as well. For more detailed information on the how just look at the code. It’s pretty simple.
Robot-specific Commands
The CaterROS planning system provides modules for the PR2 and TurtleBot robots. These contain mostly functions to control these robots.
PR2
To control the PR2 the planning system uses an action client for the action server provided by Manipulation. The pr2_command_pool package holds functions which call the action server with different controllers to move the PR2. The planning system continuously handles the feedback given by the server. Based on a break condition defined on a per-action level the feedback is evaluated. If the condition is given, the server is preempted and the action is considered successful. The break condition can consider the raw error value, the alterration rate of this value or both to evaluate whether an action is completed.
Turtlebot
The turtle_command_pool holds the designator definitions and an action client which will forward the pose to the action server of the tortugabot.
The chain is basically the following: plan_execution has an action designator, which tells the tortugabot to go to the location of an location designator. The pose which is transmitted to the location designator, is the pose of the table the current customer is at - we receive that information from knowledge. The location designator is being resolved with the help of multiple costmaps. First a circle is created with a certain radius around the position point of the table (or the tf-frame of the table). Then another circle is created, smaller in radius, around the same point. This one gets substracted from the first, so that one receives an donut shape. After this, another costmap is overlayed, which substracts all kinds of obsticles which are within the donut, from the donut. This prevents point creation within walls, since these would be unreachable. Then we receive a pose from that costmap, which through the action designator, is build into a cl-tf:pose-stamped. This gets forwarded to the action server of the turtlebot, and the turtle will then try and find a path to that point.